

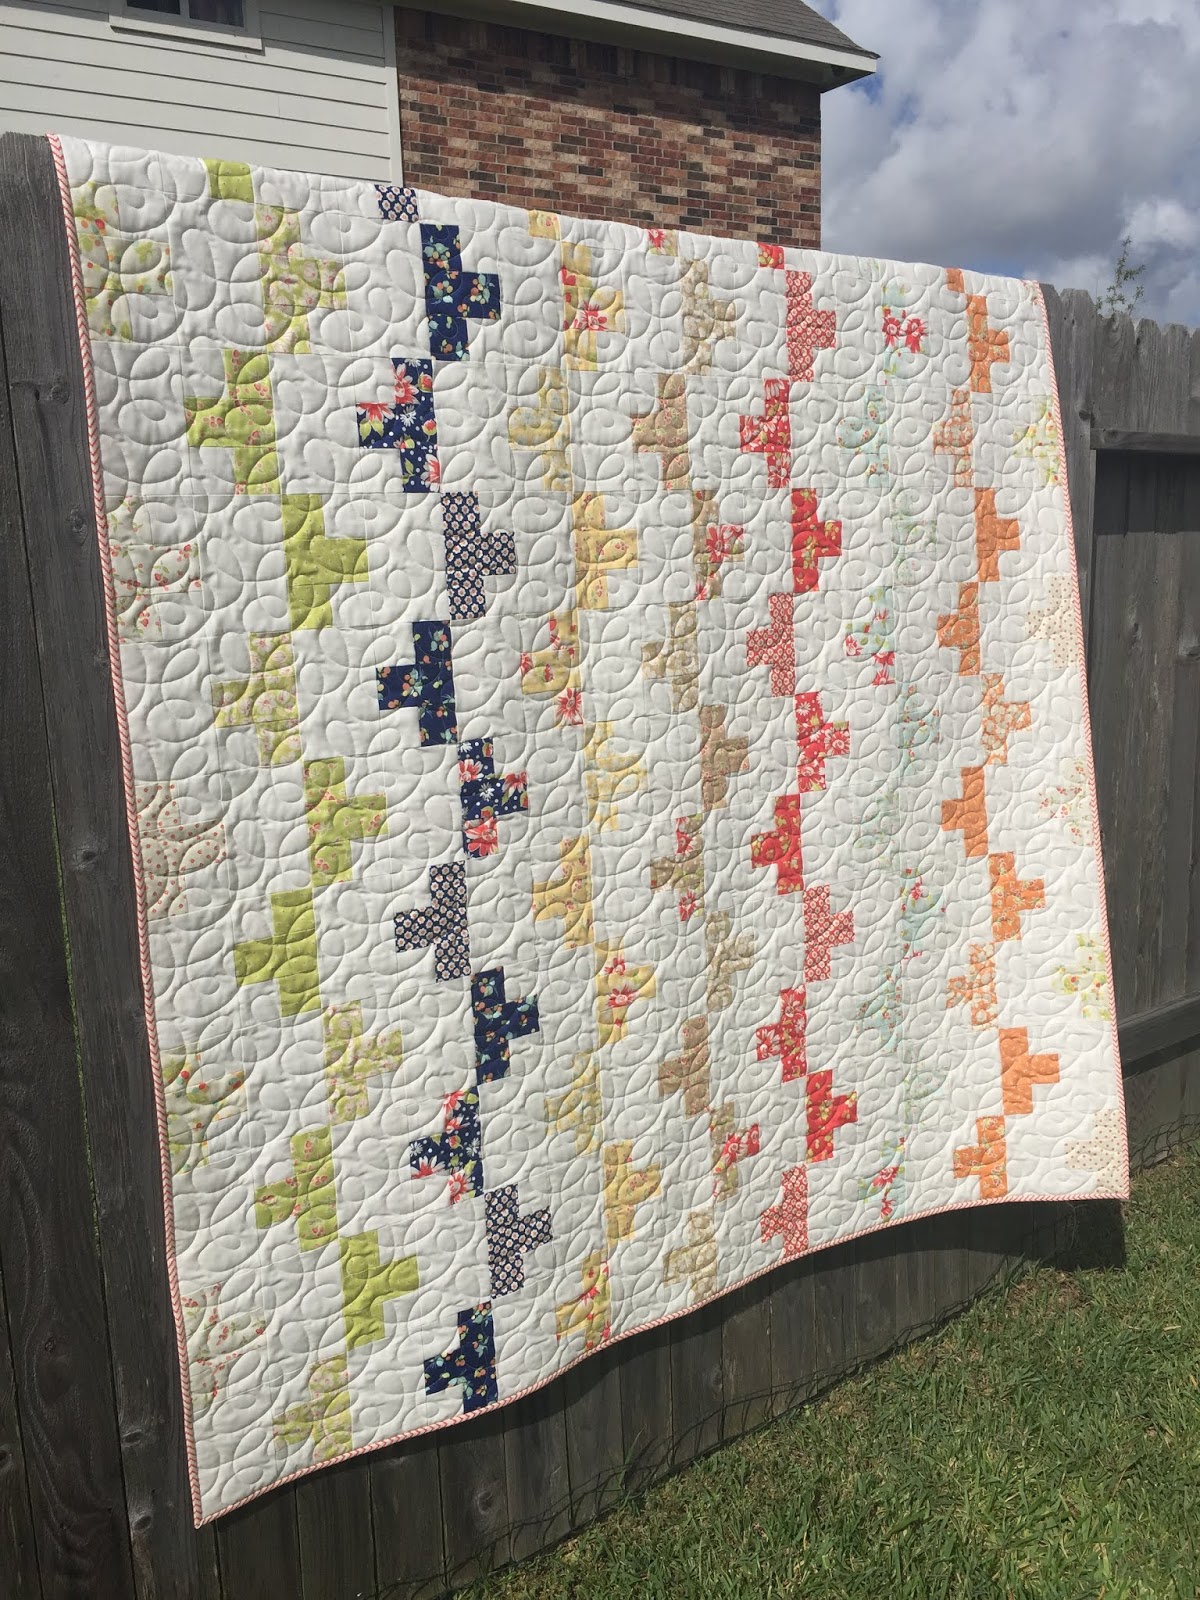
I’m calling this quilt Curtain Call. I’m sure we all get inspiration from various places, and my inspiration for this quilt came from an unusual place. During a medical procedure last summer, I was waiting for the anesthesiologist and I had nothing to do but stare at the curtain surrounding me. Quilting is never far from my mind, so of course I started thinking about how to turn the pattern on the curtain into a quilt. When they brought my boyfriend back to sit with me while I waited, I asked him to take a picture of the curtain so that I would not forget what it looked like. I'm sure he thought I was nuts!
 |
| The curtain that inspired this pattern. |
It took me over a year, but I finally got around to making
this idea a reality, and I’m really happy with the results! This quilt goes together quickly, and would
make a great NSAJRD project!


To make this quilt you will need:
- a jelly roll, or 24 2.5” strips. If you want to keep your colors grouped in columns like I did, you will need 8 groups of 3 similarly colored strips.
- 3 yards of background fabric
- 5/8 yard of binding fabric (or use leftover jelly roll strips for a scrappy binding)
- 4 yards of backing fabric

I chose three strips each of 8 colorways; aqua, cream, green, yellow, orange, tan, red, and navy. If you don't have 8 different colors in your jelly roll, you can repeat some colors if you have enough strips to divide into sets of three. Or go completely scrappy!

Cutting:
- Cut each jelly roll strip in half. Cut one half of each strip into four 4.5” rectangles. Leave the other half of each strip intact.
- From the background fabric, cut the following:
- 12 strips 2.5” wide; cut each strip in half
- 16 strips 4.5” wide; subcut each strip into 6.5” rectangles (6 per strip) until you have 96.
- From the binding fabric, cut 8 strips 2.5" wide
Next, we will use the uncut half strips and the background
strips to create strip sets. Sew each
print strip to a background strip and press towards the print.
Now subcut each strip set into 2.5” segments. You should get 8 segments from each strip
set, for a total of 192.


Sew two matching 2.5” segments on either side of a matching
2.5”x 4.5” print rectangle, making sure that both of the 2.5” segments are
facing the same direction. Press towards
the print rectangle in the middle.

Sew a 4.5”x6.5” background rectangle to the long side of
each segment made in the previous step, making sure that the background
rectangle is sewn to the side that only has the print in the middle. In other words, make sure that your
background rectangle is touching other background fabric rather than all prints. Press towards the solid background rectangle.

I suggest laying this quilt out either on a design wall, or
a floor, or even a bed before sewing any blocks together. It is really easy to get mixed up, especially
if you are keeping similar colors together in columns. I kept wanting to line up the same color
blocks in the same column, but you actually have to alternate between two
columns. I have shown the layout below, with each column shown separately, which will hopefully help this make more sense. Notice how the green blocks below are in both
column 1 and column 2, the navy blocks are in both column 2 and column 3, and
so on. Whichever color is on the far left will also be on the far right, like the light tan blocks below.

After you have the layout determined, you could sew this
together in horizontal rows. You’ll
notice that every block in the top row all face the same way and then the
second row is the opposite, and so on. However, I suggest sewing this quilt in vertical columns because you
will be able to nest the middle seams and this will help keep your blocks lined
up. If you sew the quilt in horizontal
rows, there are no seams to line up and you could end up with wonky, crooked
rows. Once you have the vertical rows
together, you will then have the seams between the blocks to help you line up
the columns as you sew them to each other. Make sure to press the seams in every other column the opposite direction so that they will nest.


Your finished quilt will measure approximately 64”x72”. I quilted mine with one of my favorite pantographs called Spring Thing.


If you make this quilt, share it on Instagram and use the
hashtag #curtaincallquilt I would love
to see it!
Until next time,
Amanda
I saw this posted on IG. What a fantastic and easy jelly roll quilt. I am adding this to my make list. Thank you for the inspiration.
ReplyDeleteI like it, thank you:) Funny how inspiration is everywhere!!
ReplyDeleteHi Amanda! What a great jelly-roll friendly quilt. I missed the latest JR weekend but I'm going to save it for next time. Thanks for sharing all the details! ~smile~ Roseanne
ReplyDeleteThank you for sharing! I made my twin nieces a jelly roll race quilt for my 2nd & 3rd quilts. I just bought 2 jelly rolls in royal jewel tones for their older sister & wanted to use a different, but still easy pattern. This is it! BTW, I listened to all my experienced quilt friends talk about how long it took them to finally make a quilt for themselves & made my 1st quilt for me. So glad I did, I get to enjoy it while I’m gifting my family and friends.
ReplyDeleteI like this. On vacation once found inspiration from tile pattern in bathroom. Thanks for the inspo. Need a quick gift. This will be great. And use up scraps! Win win.
ReplyDelete