Note:
This post contains affiliate links. I may receive a small commission (at
no extra cost to you) if you click a link and make a purchase.
Hello! Today, I'm back with some more tips for using Electric Quilt 8. Previously, I talked about importing fabric images into the software. This week, I'm going to give you some tips on editing those fabric images.
You might be wondering why you would need to edit the images you want to import. Well, you might not. I used EQ8 for several years without editing my imports. It's only been over the past year or so that I started playing around with the Image Worktable and it was the result of a new problem I was trying to solve.
Resizing Images
I mentioned this in my previous post about importing fabric, but in case you missed it, I started having problems when I got a new computer. I'm not sure why that made a difference, but I started getting this error message when I imported images downloaded from Moda's fabric downloads page.
That message does let you choose to move forward anyway and I would have just done that and hoped for the best, but I also had a problem with the scale of the fabrics being a lot smaller than on my old computer. The scale was so small, you couldn't even make out most of the prints in EQ8. Again, I didn't have this problem until I got a new computer, so I'm not sure it's an EQ8 issue, although I can't figure out what difference the computer would make, so who knows?
I started searching for an answer and discovered the Image Worktable, which I hadn't really paid much attention to before. This feature lets me change the scale and dpi (dots per inch, or resolution) of the image before adding it to my sketchbook. You can find this worktable in the upper right corner of the screen.
To begin, you will want to click Import Image, which is circled on the image above on the left. Find the image you want to import the same way you would open a file on most other computer programs. You can only choose one image at a time.
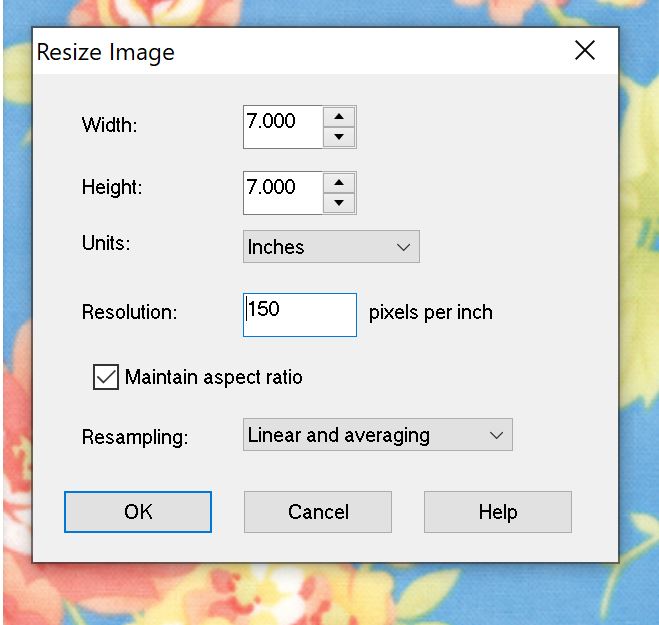
Once the image is imported, click the Resize Image option, circled below. That will bring up the box that you see below in the center of the screen.
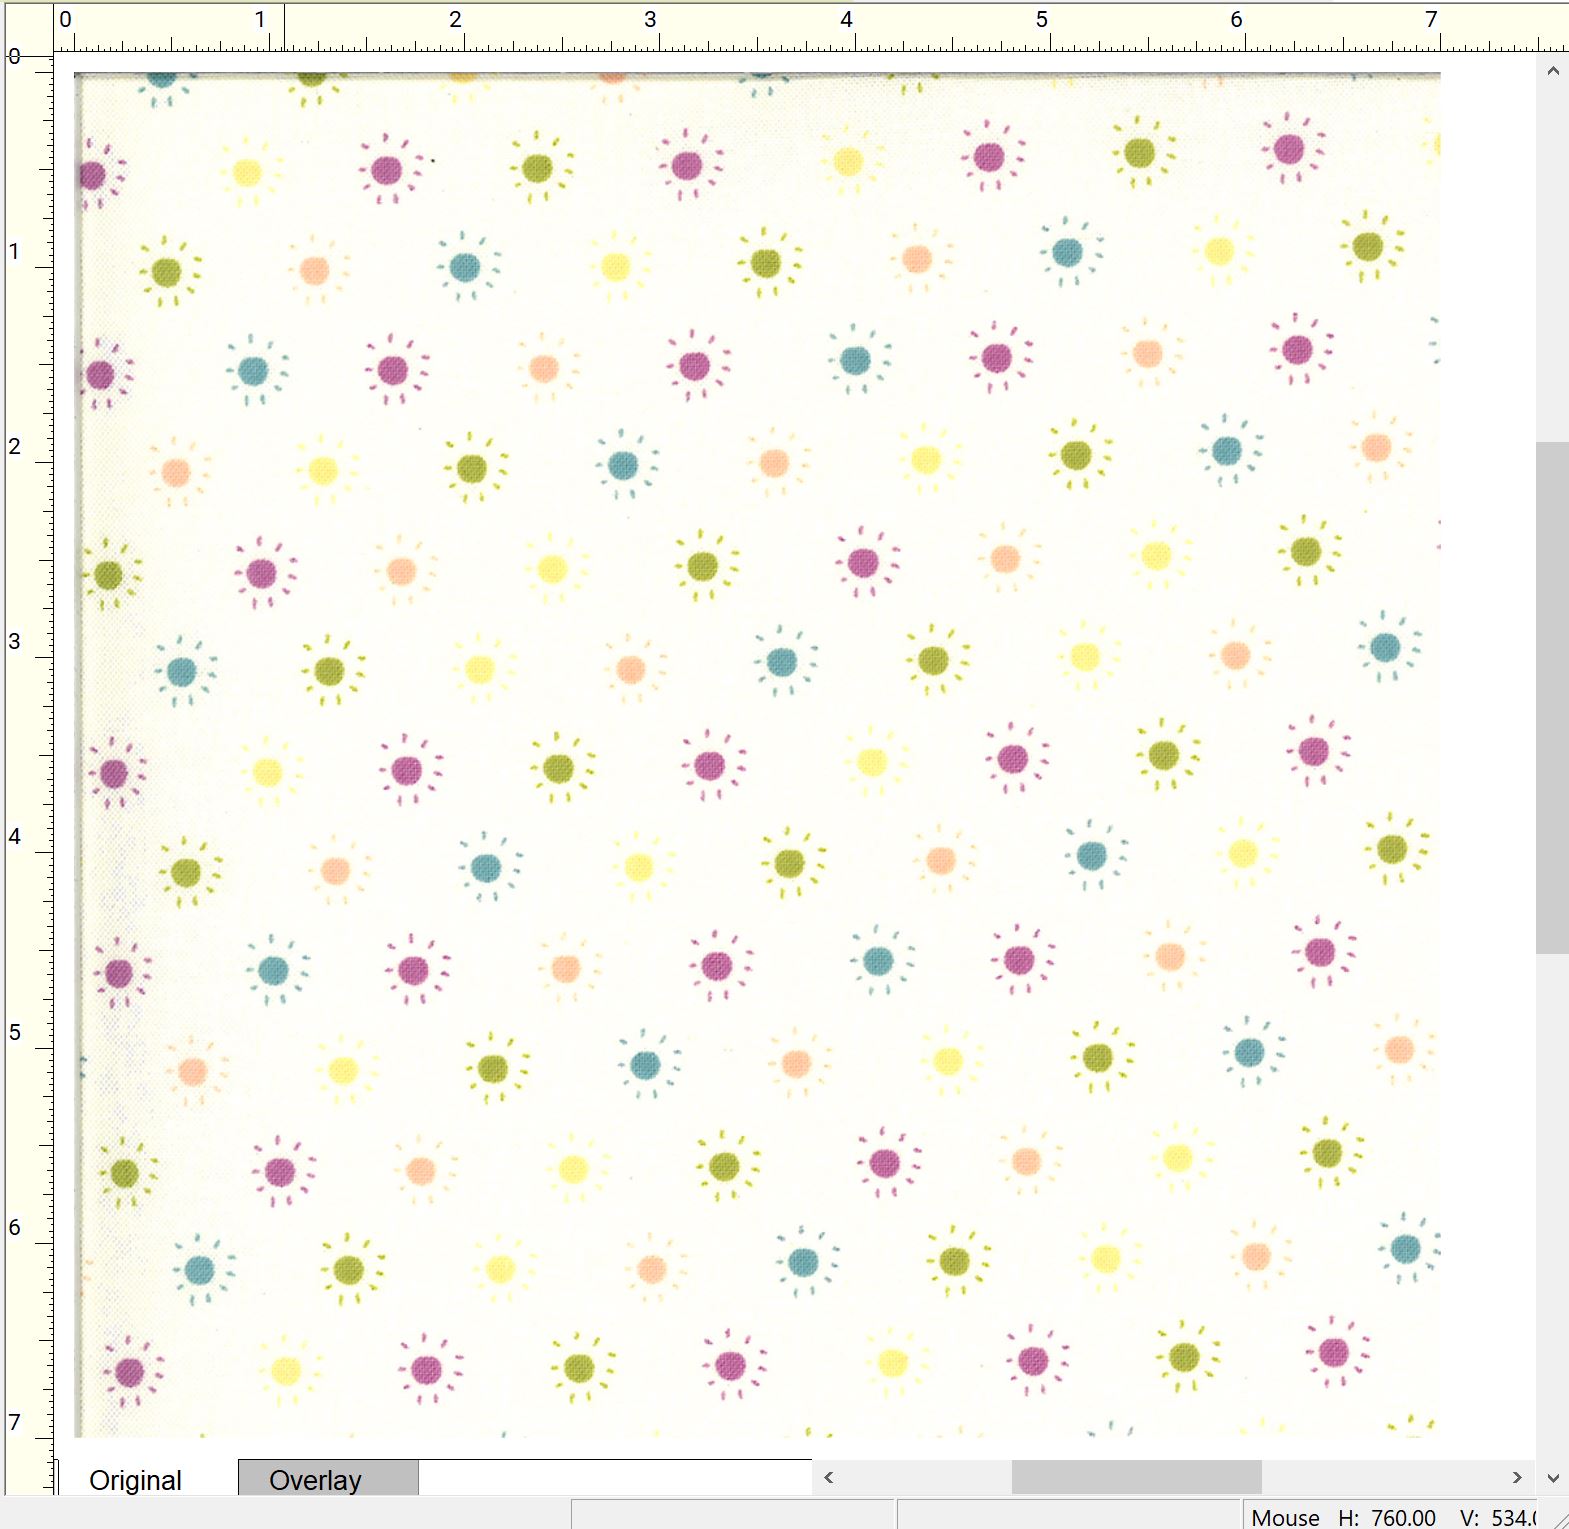
You'll notice that the size of the image is just over 3.5" square. This is what caused my small scale problem. If you download images from Moda (some other manufacturers include this as well), you'll notice that a folder of images with a ruler along the bottom is included (at least on newer collections). The ruler shows 7 inches so I tried changing the size to an even 7 inches and that seemed to solve my scale problem.
While I'm at it, I'll also change the dpi to 150 so that I don't get the message about a high dpi causing the project file size to be too large.
Click OK when you're finished. Once back on the main Image Worktable screen, you'll want to click the Add as Fabric option to add the fabric to your sketchbook.
To add the next fabric, click Import Image and repeat the process. This obviously takes a lot more time than the method I shared last week, but that is better than having images that are so small that the fabric design can't be seen or just doesn't look right.
One thing I should note... Moda seems to have made a change to their images recently and collections scheduled to arrive in shops as of July 2020 and later seem to already be sized at 7 inches square and 150 dpi. If that is the case, you should be able to import them the way I described last week and should not need to do these steps. The fact that they made this change relatively soon after I started having this problem does make me wonder if it really isn't my computer, but that would be a heck of a coincidence. Plus, I did not have this problem on my old computer with older collections and I do have that problem on my new computer with those same collections so I still think my computer has something to do with it, and you may or may not notice any problems or changes.
If you're not sure if the collection you downloaded needs to be edited, try importing using the steps from my previous post. If you don't get that error message, your dpi is fine. If you want to check the scale, import an image into the Image Worktable and see how big it is. If it's already 7 inches or so, you probably don't need to do anything.
Keep in mind that I'm using Moda as an example. Not all fabric collections will need to be 7 inches. Riley Blake, for example, seems to have 12-inch swatches.
Cropping Images
Another edit that you might want to make is cropping the image. I have noticed that some collections seem to cause dark lines in random spots when used in EQ8, especially when using light fabrics. I had come up with some ideas in Fig Tree's Chantilly a few years ago. However, the quilts looked terrible when I used that fabric. Below is a mockup of my Garden Path pattern in Chantilly. See those dark lines in some of the fabrics? I can't use that for a pattern cover. It looks even worse if I have a design with a lot more print fabric and less background.
Maybe it's just me, but it seems like that problem has become more common with the more recent fabric collections from Moda. Another instance where this affected my quilt design was the quilt I shared for this month's EQ8 Block Spotlight using Balboa by Sherri and Chelsi. You can find that quilt on Instagram here.
A section of the original version is shown below. I've circled some of the spots with lines near the bottom, but you can see several other instances where dark lines are showing on the background fabric.
When I import that fabric into the Image Worktable, you can clearly see dark edges on the left and top edges. When you use a fabric swatch in EQ8, it's going to repeat that image over and over until the block area is filled in. Those lines are showing up where the repeats are happening. To fix this, we need to crop out those dark areas. If you look closely, you'll notice that the first quarter inch or so from the left side also looks dark or kind of dirty. I'll go ahead and crop that out too.
Click on the Crop tool (circled below on the left). I couldn't get the print screen option to pick up my mouse icon, but you'll want to click and hold on the upper left corner by the two zeros on the ruler, as I've circled above. Drag your mouse until you have cropped out the areas you don't want. I try to keep it mostly square, but it doesn't have to be perfect. Just eyeball it. Release your mouse and it will look like the screenshot below.
If you're happy with it, click Apply Crop to make your changes take
effect. Don't forget to click Add as Fabric to add it to your
Sketchbook! You'll notice that the swatch is no longer 7 inches square. That's okay! You already fixed the scale, so now your swatch is smaller, but the scale is still the same. If you were to increase the size now, you would increase the scale and your fabric's print might look bigger than you want it.
Now when I replace the background fabric on that Balboa quilt with my cropped version, you can no longer see the lines!
This can be another time consuming process, but you'll be much happier with the look of your quilt designs if you take the time to do this. I seem to be cropping Moda's images more often with the newer collections, so you might not notice this on all of them. I even had a fabric swatch recently that had a stray thread visible on it! (I think Moda is scanning actual fabric to create these rather than using the digtial versions).
Of course, other fabric companies' fabric images might not be perfect either. I did notice that the Robert Kaufman images I saved for the Then Came June basics bundle (used in my Honey Squares quilt) were all over the place. Some were fine, some needed to be resized a little, some needed to be resized a lot. For that, I mostly played around with various sizes until they looked right. Many of the fabrics read as solids so it didn't really matter. Some of the prints, like the stripes and gingham were way off. I literally measured the stripes on the fat quarters I had in front of me and used that as a guide. The point is, this is definitely not just a Moda problem.
That's all for today! I hope this is helpful if you're having problems with how your imported fabrics look in your quilt designs.
If you are still considering getting your own copy of EQ8, you can check it out on the Electric Quilt website.
Until next time,
Amanda


Thank you for this post, you saved my project! I read your Instagram post and thought it was interesting. Then a few days later I had the same problem with EQ8 and some Moda photos, remembered your post and followed it here. Thanks so much!!
ReplyDeleteYou're welcome! I'm glad it helped!
Delete