
We will be making four blocks per week. This post will give you all of my tips for putting the blocks together. After this week, all of my progress will be shared on my Instagram page.
Let's get started!
 |
| I am using Nest by Lella Boutique from Moda Fabrics. |
There are a LOT of background strips to cut. If you don't want to cut all of them at once, you can cut several and make a note of how many you cut (so you won't end up cutting too many later on and run out of background fabric). You'll likely have more than you need for this first week, but that's less cutting next week! You can do the same for the accent fabric as well.
I also cut more fat quarters than I needed for this week. I typically cut at least four layers at once whenever I'm cutting. Sometimes more, if I know I have a nice sharp blade. Each fat quarter will yield two blocks, so I only need to cut two fat quarters for each week. However, I didn't want to create more work for myself, so I went ahead and cut four. I'm already ahead of the game for next week! If you want to cut even more than four at once, go for it!
Piecing the blocks
I always start with the centers of the blocks. Mainly because it's the easiest, fastest portion. You may decide you want to get the flying geese out of the way first. Don't be afraid to make the block segments in a different order than what the pattern says!
The trickiest part of making the center segments is trimming them down to size without cutting off points. It is very helpful if you have a square ruler that is the same size as you're trimming down to as this will make it easier to see exactly where the points will end up. To ensure the points in the corners don't get cut off, make sure that all four corners of the ruler are lined up on the seam lines. My units often would not allow all four corners to line up exactly. In that case, try to split the difference so that no one corner is way off. If the corners are slightly cut off, it won't be that noticeable in the finished quilt.
 |
| If you trim with the ruler positioned like this, the point on the corner will be cut off. |
 |
| Instead, make sure the corner of the ruler is on the seam line, or as close as possible. |
The flying geese are also where you will likely run into the most problems when constructing these blocks. The tips below are how I keep everything lined up as much as possible.
First, if you have a piece with a larger scale print or a print that isn't consistent throughout the fabric, you may want to take that into consideration before deciding which way to sew on the wings of the geese units. An example below is one of the floral prints that I am using.
The thin dark drawn lines represent the sewing lines, and the center area is what will be visible once the unit is completed. If it matters to you how much of the pink flower is visible, you will need to keep that in mind when sewing on the first corner square.


When I have prints like this, I try to make sure they are not all the same. For example, I don't want every unit to have a pink flower in the center of it. However, this is personal preference. If you don't care one way or the other, then you don't need to worry about this step.
My flying geese units have a tendency to be wonky. The "wings" usually end up being a little too big or a little too small. When sewing two geese units together, I try to line up what I know is straight and let the wonky parts fall where they may. In this case, I know the print base of the unit should be straight. So I'll line those two up and see what the happens with the white wing pieces.
It's hard to see, but in the photo below, I have the base of my units lined up and the left hand side of the bottom piece sticks out from the top piece a little, particularly towards the top. I also have my units lined up on a 90-degree angle that is formed on the seam guide on my sewing machine. I hope you can see on the left-hand side that it shows me that it is the bottom piece that is too big rather than the top piece being too small because the bottom piece is overhanging the straight edge formed by the orange tape. In this case, when I sew that seam, I will follow the top edge and let the extra on the bottom piece end up in the seam allowance. If it was the other way around, I would follow the big piece and let the top piece have a smaller seam allowance.

 |
| Don't worry if your geese rows are crooked. Mine usually are! |

I use the same principle here that I did when sewing my flying geese units into rows; I focus on what I know is straight. In this case, I know my center unit is straight because I trimmed them all down to size. So once I pin my rows on, I flip them over and sew from the back so that I can follow the straight edge of the center piece

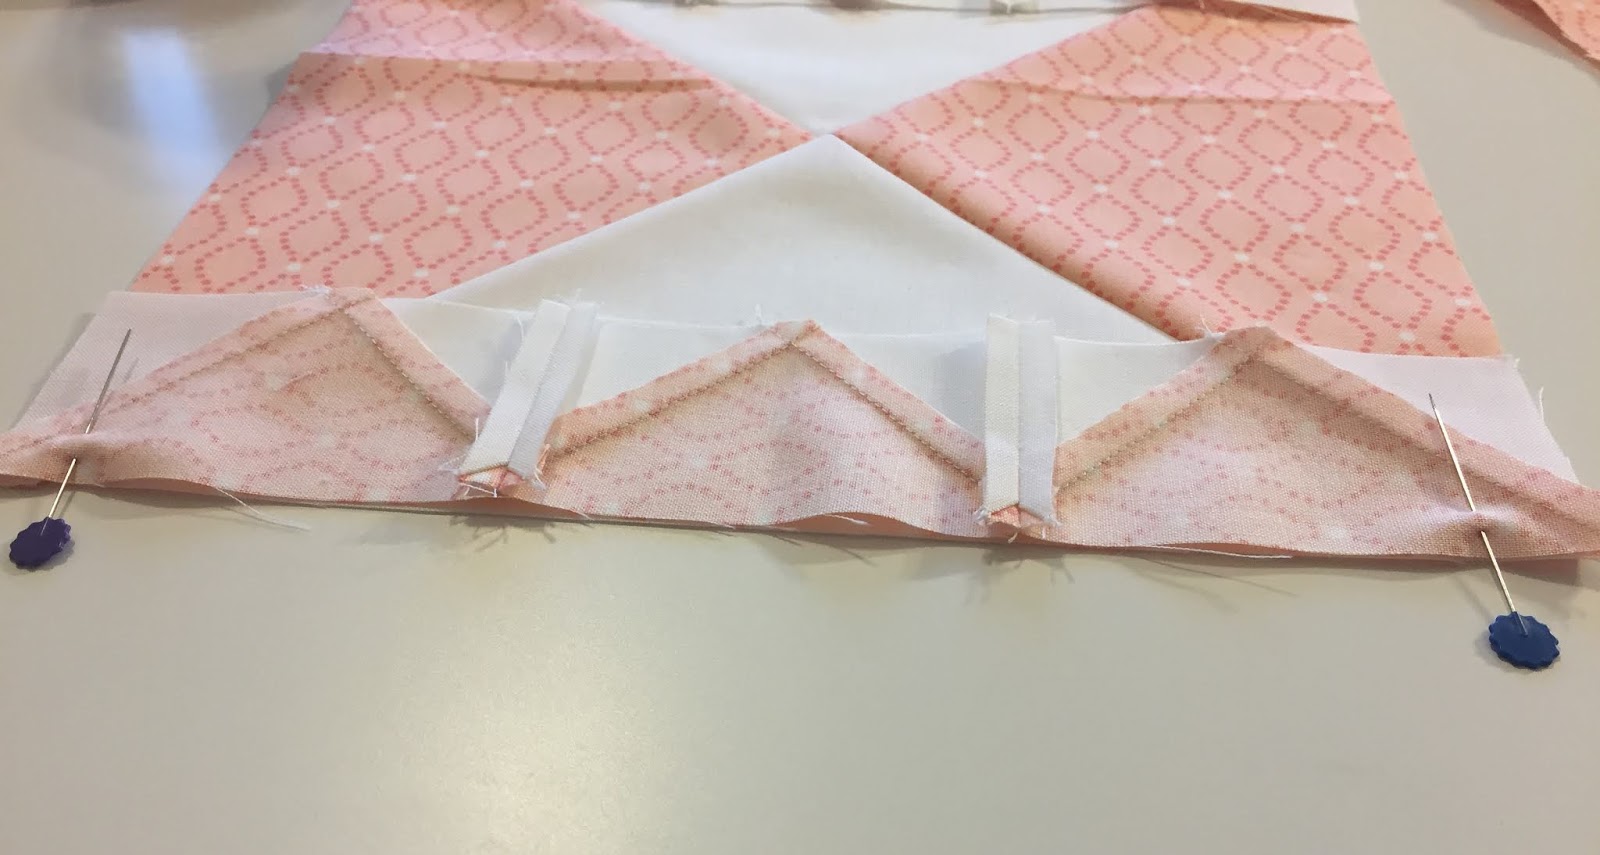
When sewing on the final two rows of geese, there are some points to line up. Since I already knew my blocks weren't going to be perfect, I didn't stress too much about lining them up. I just lifted up the piece and checked to make sure it looked like the points were pretty close.

Once I'm happy that my points will line up, I put pins on either side of that area. Then I pinned the rest of the piece into place the same way I did when attaching the shorter geese rows. I lined up the center edges of the geese units with the edge of the center unit because that small section of the print fabric was left over from the original print rectangle and I know that was accurate. If the white background pieces were not straight, I didn't worry about those.

Again, I flipped the pieces over and sewed from the back so that I could follow the straight edge of the center unit. You can sort of see how some of the white background fabric on the geese units stick out from the edge.

Once the block is complete, the edges might look a little wavy. Mine did. Again, don't worry too much about that. Everything can be eased in when the blocks are sewn together. And of course, there is some truth to the saying, "it will quilt out!"

That's it! I hope some of these tips help you with your blocks.

I can't wait to see your blocks! Post yours on Instagram with the hashtags #spunsugarsewalong or #spunsugarquilt
Until next time!
Amanda
No comments:
Post a Comment