


- 19 strips, 4" wide; subcut into 4" squares (10 per strip) until you have 190 squares.
- 11 strips, 3.5" wide; subcut into 3.5" squares (12 per strip) until you have 128 squares.
- 3 strips, 6.5" wide; subcut into 6.5" squares (6 per strip) until you have 16 squares.
- From the leftover fabric, cut two additional 4" squares and add them to the other 190. If you had already cut all 3 strips into 6.5" squares (which would have given you 18 squares), simply trim the two extra squares down to 4").
From the binding fabric, cut 8 strips, 2.5" wide.
Making the block segments:
Now it’s time to begin making the eleven billion HSTs! Okay, it’s not really that many, but it’s a lot! You’ll be turning all of the 4” squares (green and white) into HSTs.
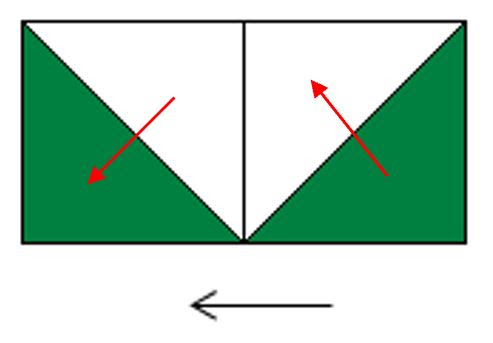
On each white background square, draw a diagonal line from corner to corner. Pair up a green and white square, right sides together (solids don't really have a right and wrong side, but you might not be using solids). Sew 1/4" from the drawn line on both sides.

At this point, you would normally be cutting your pieces in half on the drawn line and pressing all of your HSTs towards the darker fabric. However, there are a lot of instances in this quilt where the diagonal seams meet and it helps to reduce bulk and increase accuracy by having the diagonal seams nest. You're probably used to having your regular straight seams nest, but it is also possible to have all diagonal seams nest in this quilt with some careful sewing.
When you cut your sewn pieces in half, keep the two halves separate. Whether you press as you go or all at once, you will want to press half towards the green solid and half towards the white background. You will have 384 HSTs in total, with 192 pressed each way. Keep the two versions separate.

Trim all HSTs to 3.5" square.
To make Unit A, join two HSTs together as shown below. Make sure the diagonal seam of the HST on the left is pressed towards the green and the seam of the HST on the right is pressed towards the white, as indicated. Press the seam between the two HSTs to the left.
If making one block at a time, make four pairs. If making units for the entire quilt at once, make 64 pairs.
To continue making Unit A, join two more HSTs together as shown below. Make sure the diagonal seam of the HST on the left is pressed towards the green and the seam of the HST on the right is pressed towards the white, as indicated. Press the seam between the two HSTs to the right.
If making one block at a time, make four pairs. If making units for the entire quilt at once, make 64 pairs.

To complete Unit A, join one of each set of pairs together, one on top of the other, as shown below. Press towards the top pair as shown. Make four A units for one block or make 64 A units for the entire quilt.

To make Unit B, join a HST with a 3.5" background square as shown below. Make sure the diagonal seam on the HST is pressed towards the green fabric, as indicated. Press the seam between the two pieces towards the background square.
If making one block at a time, make four pairs. If making units for the entire quilt at once, make 64 pairs.

To continue making Unit B, join another 3.5" background square with a HST as shown below. Make sure the diagonal seam of the HST is pressed towards the white fabric, as indicated. Press the seam between the two pieces towards the background square.
If making one block at a time, make four pairs. If making units for the entire quilt at once, make 64 pairs.

To complete Unit B, join one of each set of pairs together, one on top of the other, as shown below. Press towards the bottom pair as shown. Make four B units for one block or make 64 B units for the entire quilt.

Making the block:
To make one block, arrange four A units, four B units, and a 6.5" background square as shown below. Pay close attention to the orientation of each piece (check twice, sew once!)
Sew the pieces into three horizontal rows, pressing the top and bottom rows to the left and the middle row to the right, as shown below.

Join the three rows together and press towards the upper rows as shown below.
Repeat to make 16 blocks.

Assembling the quilt top:
Arrange the blocks into four rows of four blocks each. Rotate every other block a half turn to allow the seams to nest. Press every other row in alternate directions so the seams will nest between rows. The long seams between rows can be pressed in either direction.

Your finished quilt will measure 72x72.

Quilt as desired and bind. I quilted mine with an edge-to-edge pantograph called Lotus Blossom.
For the backing, I decided to use something colorful to offset the relatively plain front. I went with this floral Rifle Paper Co print from their Primavera line.

For the binding, I was originally going to use the same Kona Enchanted green, but I changed my mind and went with a black and white stripe from Riley Blake instead and I love it!


I hope you enjoy making this quilt as much as I did! If you share yours on Instagram, be sure to add the hashtags #piecedjustsew and #enchantedquilt so I can see it!
Until next time,
Amanda
Really fabulous info about the quilting love you
ReplyDelete